OpenVMS Notes: "Alpha to Itanium" Porting Diaries
- Platforms like PDP, VAX, and Alpha employ a firmware-based BIOS where you could boot the system with commands like "b dua0" to boot from disk dua0
- All modern computers, including Itanium, now employ a firmware-software-hybrid technology, known as UEFI, which executed by an internal management processor (some sort of x86 thingy that is always running as long as power supply available, even if the server is powered off)
- You can do a lot of stuff from a locally connected VGA terminal and keyboard but this does not include installing OpenVMS on a disk for the first
time. That activity must be done over the serial port, or iLO, which acts as terminal device OPA0:
serial this activity will require a serial null-modem cable connected between your Itanium and your laptop (or a VT100 compatible monitor if you can find one). Connecting a serial cable to your laptop may require the purchase of a third-party dongle (USB-to-DB9). See my notes below.
CAVEAT: You do not want to be doing this for the first time on a weekend, or national holiday, or during an emergency. Learn how to do it now, then make many notes for future reference.iLO obviously no special hardware is required to connect to an iLO port. But you would need to set the iLO address, then connect it to your network, then connect to the port via another computer on the network.
The Name Game
- In 1985, Intel began using the phrase IA-32 (Intel Architecture 32) to market their 32-bit x86 processor chips
- In 1998, Intel began releasing Xeon variations of IA-32 targeted at the commercial server market
- In 2001, Intel began using the phrase IA-64 (Intel Architecture 64) to market their 64-bit Itanium processor chips
- in 2003, HP began using the name HP Integrity to market servers contained Itanium
processors (huh?)
- IMHO, this is one reason why most computer professionals today do not know the name Itanium
- In 2003, AMD added 64-bit extensions to their 32-bit x86 processors which they marketed as AMD64
- In 2004, Intel followed AMD's lead by adding 64-bit extensions to their 32-bit x86 architecture which they marketed as INTEL64
- Now both product lines are collectively known as the x86-64 architecture
- Because everyone knew that IA-32 meant x86, many people assume IA-64 means x86-64 (this WP article proves they are mistaken: https://en.wikipedia.org/wiki/IA-64)
- Things have gotten so bad that most of the Linux community has adopted this informal naming convention for their distributions:
Code Meaning Notes i586 Pentium compatible "i" prefix because Intel developed it first i686 Pentium Pro compatible "i" prefix because Intel developed it first AMD64 x86-64 compatible AMD because this was the first company to release 64-bit extensions to x86 I64 Itanium Here "I" means Itanium
- on this page I will only use the name Itanium
A very brief history of Itanium
- Everyone reading this might wish to be familiar with these terms:
- In the 1989, HP was developing a successor to VLIW which would eventually be referred to as EPIC (Explicitly Parallel Instruction Computing)
- Realizing that this would be too big for one company, HP partnered with Intel in 1994 to develop an EPIC-based chip which would code named Merced
- Merced was expected to appear in 1997 but was delayed until 2001. The main reason for the delays are two fold:
- RISC and VLIW chips kept getting faster but Merced was not able to match them
- unlike RISC-based compiler enhancements, expected EPIC-based compiler enhancements never occurred
- I've often wondered if Merced was intended as nothing more that a prototype (much like the 8088 was intended to be a prototype for the 8086) because only a few thousand were ever made. Merced is the only chip officially known as Itanium. All subsequent chips were known as Itanium2
- Anyway, the economic failure now known as the dot-com crisis left the economy too poor to take advantage of this seemingly experimental chip
- The first Itanium2 was released in 2002 but was still considered too expensive by many customers.
- Business History:
- Compaq purchased the remainder of DEC (Digital Equipment Corporation) in 1998.
- HP purchased Compaq in 2002 but for some reason called it a merger.
- Now HP decided to charge ahead with Itanium (in both the HP and Compaq divisions).
- Once Intel started manufacturing x86-64 in 2004, HP began manufacturing computer systems based upon this new 64-bit architecture.
Project-01 : HP rx2800-i2
Introduction (my first Itanium)
- I'm not sure where I am going to go with this web page since moving from Alpha to Itanium should be a whole lot easier than my previous move from VAX to Alpha which involved code renovation (necessary due to sloppy programming in our group which happened during a decade
of "no code reviews")
- 99% of our source code (~ 200 programs: 90% VMS-BASIC; 10% DEC-C) is built from DCL scripts so I suspect we will only need to use DECnet to copy over the source code then generate a master script to invoke the individual build-scripts (when necessary) or just perform a vanilla compile-then-link.
- 1% of our source code involves special odds-n-ends like gSOAP so would need to be built separately
- I had previously been involved in buying VAX technology from Digital Equipment Corporation (DEC) as well as Alpha technology from Compaq
Computer Corporation but this was my first time buying Itanium technology from Hewlett Packard Corporation
- OpenVMS software licensing has simplified with each owner. With HP, licensed software under "an active support agreement" has a 100% trade-in value so is transferred to the new platform at no charge. Licensed software not under a current support agreement has a 40% trade-in value. In either case you must supply software authorization numbers.
- What we purchased:
- rx2800-i2 rack-mounted Itanium server
- one quad-core 9340 Itanium processor (1.60GHz/5.0MB) which means it is from the Tukwila
family
- like Windows, OpenVMS sees eight CPUs due to hyper threading (when they are enabled)
- rx2800-i4 machines are based upon 9500 series Itaniums which means they are from the Poulson family
- 64 GB of RAM
- one DVD drive
- two 300 GB drives
- one built-in P410i Smart Array controller (configured for RAID-1)
- Caveat: what follows are not full days; this was a spare-time project worked outside my normal daily duties
Day 1 (well, just a few hours one afternoon)
- The machine arrived two weeks ago by air from Singapore
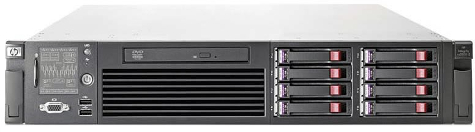 Itanium rx2800-i2
(drives are horizontal) - It was racked and powered-up by an HP field technician yesterday (2015-06-18). This technician knew nothing about OpenVMS but told us that we could have ordered a machine with a preinstalled OS (this was news to us). We were also told that we could put in a request to have another HP technician install OpenVMS for an additional fee (we declined).
- No paper manuals or optical media were found in the box. Just a letter saying that online manuals are available at the HP website. The bad news for me is that this was around the time that HP was preparing to split into two companies: HP and HPE. The first thing they did (pre split) was to begin splitting their website which meant that a lot of documentation I needed was not available at either www.hp.com or www.hpe.com
- Anyone coming from an Alpha background will be in for a shock because newer Itaniums do not have a traditional console. Almost everything is done via
the serial port associated with the iLO (integrated lights out) port. These machines are
meant to run in a datacenter and maintained by people off-site.
- When I first saw this I recalled my introduction to VAX-8550 which employed a DEC-Pro350 (a personal computer based upon the PDP-11 which ran a modified version RSX-11) as a console. Although sometimes a pain, having a smaller computer managing a larger computer offered unexpected advantages; especially during boot (more on this in a moment)
- As an aside, the PDP-11/44 employed an Intel 8085 to implement a serial console which included bootstrap support. Management Processors have been with us for a very long time
BIOS - EFI - UEFI
- Personal Computers since the introduction of the IBM-PC in 1981 employed BIOS firmware to bring hardware up to a
known state before booting an OS.
- as PCs scaled up to replace traditional minicomputers, BIOS implementations were leveraged to meet the challenge. Anyone who has ever worked with x86-based commercial servers are already aware of one of the dangers: removing a drive (or rebooting with a dead drive) will cause all the lettered drives after it to move up one position in the alphabet. This causes a real mess if anything boots by, or is mounted by, drive number.
- Most people reading this will be surprised to learn that BIOS on modern x86 machines still has the original limits: 16-bit processor mode; dealing with memory in 64 KB blocks via segment registers but never accessing more than 1 MB (the actual code limit is 640k); Ad hoc code is sometimes tacked on to do boot-time memory tests above 1 MB
- But most important of all, BIOS is almost always was run by the host CPU
- In the late 1990s, Intel (working with HP on Itanium) began a project named Intel Boot Initiative which published a successor technology in 2002 named EFI (extensible firmware interface). This is best thought of as a tiny OS run on a small Management Processor (or simply MP). This management processor is then used to manage the host environment (see: VAX-8550 comment above)
- In 2005 Intel transferred control of EFI to the Unified EFI Forum which now consists of over a dozen companies. EFI was then rebranded UEFI
- To learn more:
- The Management Processor on the iLO of my rx2800-i2 hosts an x86 CPU
- Anyone who has ever peeked inside any of the EFI files will see:
- the phrase "This program cannot be run in DOS mode" starting at byte-79 (if you count from byte one)
- see https://en.wikipedia.org/wiki/Portable_Executable for more details
- little endian observations
- byte-01 and byte-02:
- x5A4D
- byte-75 and byte-76
- x014C: EFI Image: IA32
- x0200: EFI Image: IA64 (I think this means Itanium)
- x0EBC: EFI Byte Code (think "Java virtual machine")
- byte-01 and byte-02:
So what's in your Itanium?
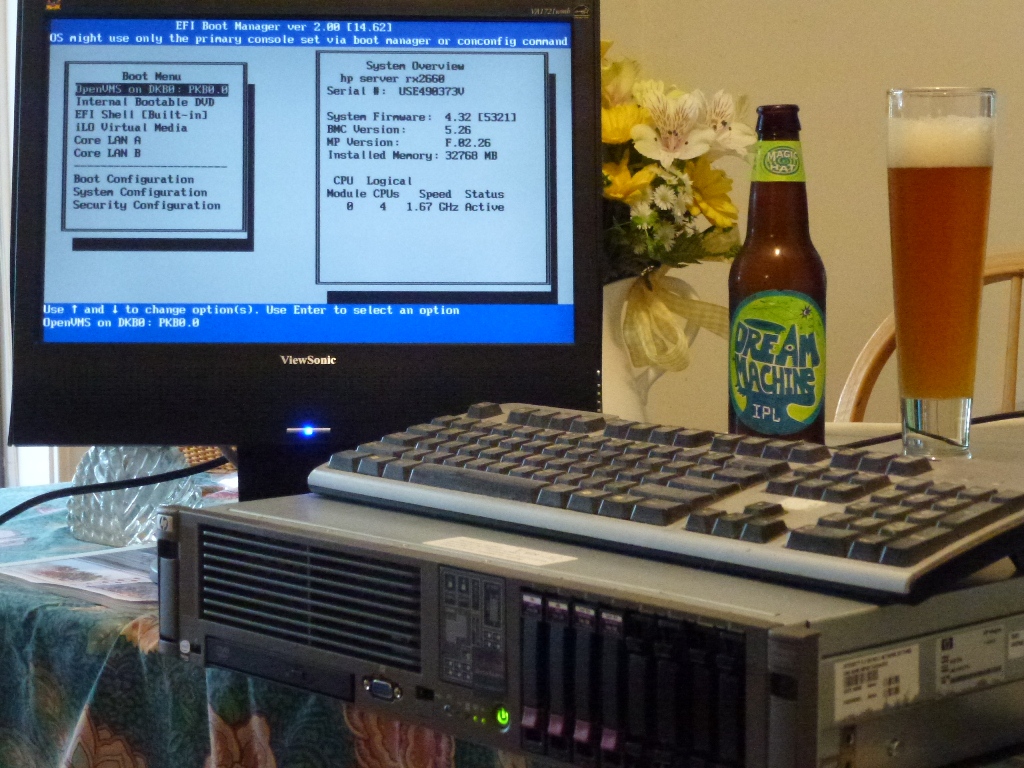
(drives are vertical; beer is optional)
- Previous generation machines employed EFI (sometimes pronounced "Effie")
- EFI systems presented a so-called "legacy mode" which is nothing more than yellow text on a black background (used mostly in large data centers)
- You could switch it into a graphics-based setup display as seen in the rx2650 photo to the right but certain changes (like enabling/disabling threading) must be
done in "legacy mode"
- comment: if you didn't know any better you would swear you are looking at a picture of an ProLiant DL380 or DL385. Notice that these drives are slotted vertically.
- While the rx2650 pictured to the left has what appears to be a graphical firmware display, all of my rx2660 machines do not
- Newer Itaniums employ UEFI (sometimes pronounced "U Effie")
- Although my rx2800-i2 does support VGA graphics, USB-keyboard and USB-mouse, the interface contains no graphics and appears to be totally text-based (proportional
spacing). Furthermore, no provision was made for a booting OpenVMS while communicating with this graphical display.
- from UEFI you issue the boot command
- your VGA monitor will simply display the phrase: Booting OpenVMS 8.4 followed by a string of more than 80 dots
- boot messages, including errors and failures, are now only visible on the iLO port or the DB-9 console
- The VGA monitor, keyboard, and mouse will only become fully operational after OpenVMS is fully up and has started an X-Windows/Motif terminal. It is for this reason that you should divert the output of script sys$manager:systartup_vms.com to a log file in folder sys$manager
- Although my rx2800-i2 does support VGA graphics, USB-keyboard and USB-mouse, the interface contains no graphics and appears to be totally text-based (proportional
spacing). Furthermore, no provision was made for a booting OpenVMS while communicating with this graphical display.
UEFI over an iLO DB-9 console port
- Method #1 (old school)
- Grab a VT compatible monitor (I used a VT-220)
- Both computer and monitor are DTE (electrical male) so you will need a female-to-female crossover cable (also known as a null-modem cable)
- Cable-1 is a DB9-female-to-DB25-female.
- Cable-2 is a DB25-female-to-DB25-female.
- I connected the cables with an old-school breakout-box (needed to throw the switch labelled "swap 2-3")
- Method #2
- Used a laptop along with a USB-to-DB9 dongle.
- In my case both serial ports were DTE (electrical male) so I needed an F-F null modem cable. TeraTerm worked like a charm.
- The default settings for rx2660 are 9600 baud, 8-bits, no-parity
- Factory Defaults (almost always changed by the equipment installer)
Machine Serial
PortsPort
NamesConsole
User NameConsole
PasswordNotes rx2660 2 Aux, Console Admin Admin MP access over the Console port
(password should be modified by the installer)rx2800-i2 1 Aux Administrator see pullout tag MP access over the Aux port DL385p_gen8 1 Aux Administrator defined in BIOS MP access not available over any ports
(setup the iLO from BIOS then use Ethernet) - Do yourself a favor and build a Data Center Survival Kit now
because you do not want to do this during a "Sunday night emergency" or "a national holiday")
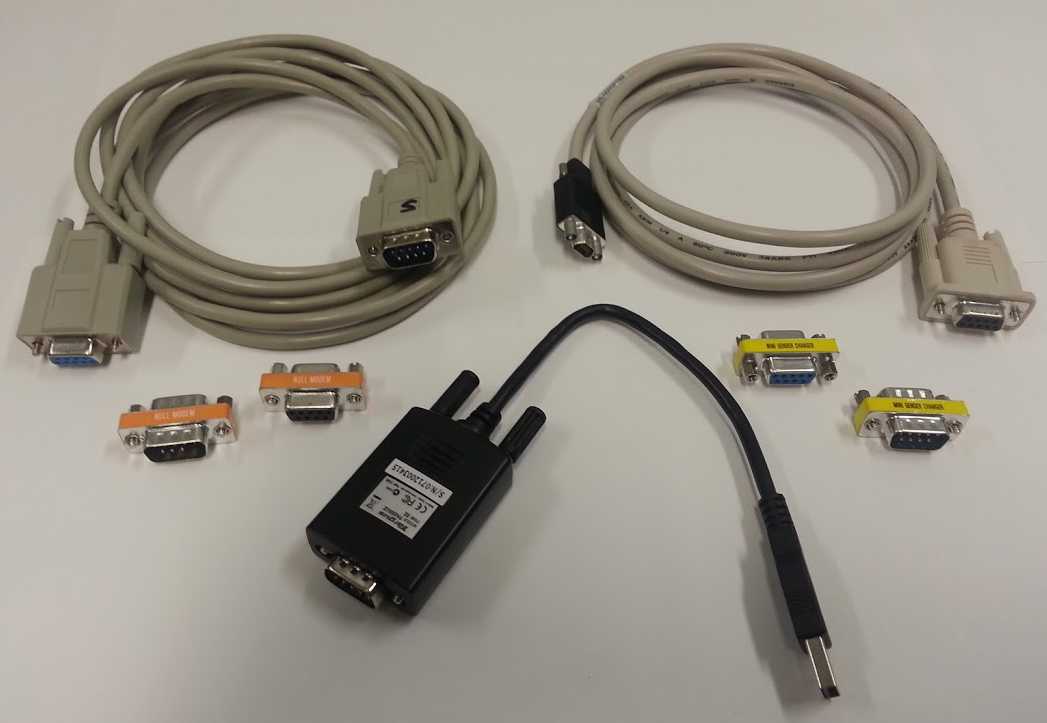 Data Center Survival Kit
- You will need:
- an old-school briefcase (engineers never use knapsacks)
- one USB-to-DB9 dongle for your laptop (somehow I ended up with several but only one is shown)
- the black dongle shown in the photo is better than average and has three indicator LEDs (1-Link, 2-Tx, 3-Rx)
- a blue+silver dongle (not shown)
- after you finish installing the driver software from the supplied optical media, store it behind the document divider in briefcase
- two null-modem adapters: one Male-to-Male; one Female-to-Female (orange paint in the photo)
- two straight-through gender changers: one Male-to-Male; one Female-to-Female (yellow paint in the photo)
- one 3m/10ft straight-through serial cable (Male-to-Female) pictured top-left
- one USB-based CD-DVD drive (not shown) so you can load your driver from the optical media. These drives were standard in 2015 but have disappeared in 2022).
- optional:
- If you work on external storage arrays associated with DL380 then you will also need a DB9-to-micro-DB9 serial cable (pictured top-right; one end is gray whilst the other is black). One is usually supplied with each storage array but they tend to "walk away" if you know what I mean
- Some real VT-320 monitors employ a 25-pin connector on the monitor and come with a 25-pin to 9-pin cable. Don't allow these to walk away
- Here is what I used recently (2025-01-30):
Classification Notes Laptop USB DTE
1 Blue+Silver Cables-to-go USB DB9m DTE This cable was associated with the only Windows-10 compatible driver in my case 2 Straight DB9f DB9m
3 Null-modem (orange) DB9f DB9f
4 computer DB9m DTE
- You will need:
- caveat: going forward, it might make more sense to build an iLo Maintenance Network
Wasted Time (caused by me)
- to be fair, PDF manual "HP Integrity rx2800 i2 Server User Service Guide" clearly states on that OpenVMS must be installed on Itanium using a serial console (or iLo port) but I was certain the HP document was outdated (I was wrong)
- surfing around (via Google) will take you to sites claiming that a VGA monitor could be used to do the initial OS install by first reconfiguring the console via the
CONCONFIG command from the UEFI shell. Perhaps those sites were installing HP-UX, or perhaps that method works for other Itaniums but it did not work for me.
- CONCONFIG Experiments:
- setting "VGA = primary" and "SERIAL = off"
- failed; VMS came up part way but then displayed an error message about being unable to continue without a serial port
- setting "VGA = primary" and "SERIAL = secondary"
- failed; VMS came part way up then prompted for date + time. I was unable to enter it into either keyboard
- setting "SERIAL = primary" and "VGA = secondary" (this was the way the machine was delivered)
- success
- setting "VGA = primary" and "SERIAL = off"
- CONCONFIG Experiments:
Initial Setup
- optional: connect a VGA compatible monitor, USB-keyboard, USB-mouse
- power-up the system without any media in the DVD drive
- if you are watching from a serial terminal connected to the iLO port, you will see your first message within a minute
- additional messages will be seen within 2 to 5 minutes depending upon whether boot-time device diagnostics are disabled or enabled
- you will not see startup messages at the VGA monitor so be patient
- eventually you will see the MP MAIN MENU on both the iLO port as well as the VGA monitor
- type S to drop into the UEFI shell before the 7-second timer expires (this delay can be adjusted either way; nothing wrong with 15 or 20 seconds)
legend for my examples:
	<sr>	system response (what the system displays)
	<ur>	user response (what you should type or do)
	(text)	some action is described
	<enter>	hit the "enter" key
----------------------------------------------------------
<ur>	(connect a serial line to the iLO port then hit <enter>)
<sr>	MP login:
<ur>	Administrator
<sr>	MP password:
<ur>	******** (found on a pullout tag on the front of your chassis)
<sr>	Hewlett-Packard Integrated Lights-Out 3 for Integrity
	(C) Copyright 1999-2013 Hewlett-Packard Development Company, L.P.
		MP Host Name: kawc0x
		iLO MP Firmware Revision 01.55.02
	MP MAIN MENU:
		 CO: Console
		VFP: Virtual Front Panel
		 CM: Command Menu
		 CL: Console Log
		 SL: Show Event Logs
		 HE: Main Help Menu
		 X: Exit Connection
	[kawc0x]</> hpiLO->
<ur>	co
<sr>	(iLo system connects to system Itanium console)

	[Use Ctrl-B or ESC-( to return to MP main menu.]

	- - - - - - - - - - Prior Console Output - - - - - - - - - -
	1,0,0,0 5400006301E10000 0000000000000000 EVN_BOOT_START
	***********************************************************
	* ROM Version : 01.95
	* ROM Date    : Fri Feb 01 03:54:28 PST 2013
	***********************************************************
	1,0,0,0 3400083701E10000 000000000002000C EVN_BOOT_CELL_JOINED_PD
	1,0,0,0 340000B101E10000 0000003C0205000C EVN_MEM_DISCOVERY
	1,0,0,0 1400002601E10000 000000000006000C EVN_BOOT_CPU_LATE_TEST_START
	1,0,1,0 1400002605E10000 000000000006000C EVN_BOOT_CPU_LATE_TEST_START
	1,0,2,0 1400002609E10000 000000000006000C EVN_BOOT_CPU_LATE_TEST_START
	1,0,3,0 140000260DE10000 000000000006000C EVN_BOOT_CPU_LATE_TEST_START
	1,0,1,1 1400002607E10000 000000000006000C EVN_BOOT_CPU_LATE_TEST_START
	1,0,2,1 140000260BE10000 000000000006000C EVN_BOOT_CPU_LATE_TEST_START
	1,0,3,1 140000260FE10000 000000000006000C EVN_BOOT_CPU_LATE_TEST_START
	1,0,0,1 1400002603E10000 000000000006000C EVN_BOOT_CPU_LATE_TEST_START
	1,0,0,0 5400020701E10000 000000000011000C EVN_EFI_START

	Press Ctrl-C now to bypass loading option ROM UEFI drivers.

	1,0,0,0 3400008101E10000 000000000007000C EVN_IO_DISCOVERY_START
	1,0,0,0 5400020B01E10000 0000000000000006 EVN_EFI_LAUNCH_BOOT_MANAGER

	(C) Copyright 1996-2010 Hewlett-Packard Development Company, L.P.

	Note, menu interfaces might only display on the primary console device.
	The current primary console device is:
	Serial PcieRoot(0x30304352)/Pci(0x1C,0x5)/Pci(0x0,0x5)
	The primary console can be changed via the 'conconfig' UEFI shell command.

	Press:  ENTER  -  Start boot entry execution
		B / b  -  Launch Boot Manager (menu interface)
		D / d  -  Launch Device Manager (menu interface)
		M / m  -  Launch Boot Maintenance Manager (menu interface)
		S / s  -  Launch UEFI Shell (command line interface)
		I / i  -  Launch iLO Setup Tool (command line interface)

	*** User input can now be provided ***

	Automatic boot entry execution will start in 7 second(s).
<ur>	s
<sr>	Searching for devices.
	HP Smart Array P410i Controller     (version 5.78)  1 Logical Drive
	Currently the controller is in RAID mode
	Launching UEFI Shell.
	UEFI Shell version 2.10 [2.0]
	Current running mode 1.1.2
	Device mapping table
	  fs0    :Removable HardDisk - Alias hd9a0b blk0
		  PcieRoot(0x30304352)/Pci(0x1,0x0)/Pci(0x0,0x0)/Scsi(0x0,0x0)/HD(...)
	  fs1    :Removable HardDisk - Alias hd9a0d blk1
		  PcieRoot(0x30304352)/Pci(0x1,0x0)/Pci(0x0,0x0)/Scsi(0x0,0x0)/HD(...)
	  blk0   :Removable HardDisk - Alias hd9a0b fs0
		  PcieRoot(0x30304352)/Pci(0x1,0x0)/Pci(0x0,0x0)/Scsi(0x0,0x0)/HD(...)
	  blk1   :Removable HardDisk - Alias hd9a0d fs1
		  PcieRoot(0x30304352)/Pci(0x1,0x0)/Pci(0x0,0x0)/Scsi(0x0,0x0)/HD(...)
	  blk2   :BlockDevice - Alias (null)
		  PcieRoot(0x30304352)/Pci(0x1F,0x2)/Sata(0x0,0x0,0x0)
	  blk3   :Removable HardDisk - Alias (null)
		  PcieRoot(0x30304352)/Pci(0x1,0x0)/Pci(0x0,0x0)/Scsi(0x0,0x0)/HD(...)
	  blk4   :Removable BlockDevice - Alias (null)
		  PcieRoot(0x30304352)/Pci(0x1,0x0)/Pci(0x0,0x0)/Scsi(0x0,0x0)
	Press ESC in 1 seconds to skip startup.nsh, any other key to continue.
	Shell>
--------------------------------------------------------------------------------------
Caveat: this listing actually shows two initialized volumes (file systems are prefixed
with "fs") and five block structured devices (prefixed with "blk"). On a brand new
system (with no optical media present in the DVD drive) you will likely see one or
more "blk" entries and zero "fs" entries. Notice how fs0 (red) points to blk0 (red)
and vice versa. Also notice the alias names in green and purple.
Booting the OpenVMS ISO DVD from UEFI (without the boot manager)
<sr>	Shell>
<ur>	map
<sr>	(system will display known devices; init'd media will appear with fs# entries)
<ur>	(insert VMS media into the DVD drive)
	map -r
<sr>	("-r" forces the map command to rescan all the hardware)
	(the system will display known devices; now "fs0:" now refers to the DVD)
<ur>	fs0:
<sr>	fs0:>\
<ur>	ls
<sr>	(should get a directory listing)
<ur>	cd efi\boot
<sr>	fs0:\efi\boot>
<ur>	bootia64
<sr>	(OpenVMS boots then displays the familiar 8-line installation menu)
<ur>	(use the menu to install OpenVMS on the desired drive)
        ======================================================
        Once OpenVMS is installed, eject the DVD then reboot
        The system will reboot to UEFI but not OpenVMS (huh?)
Booting OpenVMS from the disk you just built (with the boot manager)
<sr>	Shell>
<ur>	map
<sr>	(displays known devices; in my case fs0: now refers to the OpenVMS disk)
<ur>	fs0:
<sr>	fs0:>\
<ur>	bcfg boot add 1 \EFI\VMS\VMS_LOADER.EFI "OpenVMS 8.4"
<sr>	fs0:>\
<ur>	exit
<sr>	system will drop into the UEFI menu
<ur>	B
<sr>	system will display boot menu
<ur>	choose the first entry (if you entered "add 1" above)
<sr>	system will boot OpenVMS
--------------------------------------------------------------------------------------
Question: So what just happened? Answer: The boot configuration command (BCFG) looked
at my currently selected device (fs0) then used associated drive information
(1459B1241-18EB-11E5-9F2B-AA000400FEFF in my case) to make an entry into position #1
of the boot configuration table. Previous entries were pushed down by one position.
Coles Notes Summary: we now boot by UUID rather than drive letter
Day 2 (Installing OpenVMS)
- On page 37 of the 2013 manual HP Integrity rx2800 i2 Server User Service Guide we read:
For OpenVMS installation, see the VMS84I_UPDATE-V0500.RELEASE_NOTES
document available in the HP Support Center
which I correctly assumed meant we need to install VMS84I_UPDATE-V0500 right now - I incorrectly thought the simpler route would be to register/load the OpenVMS License into the license manager then enable DECnet so I could employ the network to copy the patch from another system. This was a big mistake. Shortly after I loaded the license I encountered a stack dump. Every reboot after that ended in a stack dump
- At this point I had two choices:
- reboot the DVD; drop into DCL; mount the disk; connect to the license manager on that disk to unload the license
- reboot the DVD; reinstall OpenVMS
(I chose this option because, once started, I could walk away to take care of some other pressing matters associated with my daily duties)
- Once the system was back up, I used a PC to burn the patch onto a CD-ROM then used SneakerNet to get it to the Itanium. I copied the self-extracting patch from the optical drive then used PCSI to install it. Once rebooted, I registered/loaded the OpenVMS license; everything worked like a charm
- I was previously worried about the RTC (real time clock) because every boot of OpenVMS prompted me to input the DATE + TIME at the serial port console. This stopped as soon as I installed VMS84I_UPDATE-V1000 which happened to be the latest available kit
- As stated previously, you won't see any console messages from script SYS$MANAGER:SYSTARTUP_VMS.COM on the VGA monitor so it would be wise to modify the startup script then divert SYS$OUTPUT to file SYS$MANAGER:SYSTARTUP_VMS.LOG (remember to close the channel before the script exits)
Day 3
- installing "DECnet phase IV", "TCPIP for OpenVMS", and "Apache" went without a hitch
- DECnet makes coping files to-from the old AlphaServer-DS20e child's play
Day 4
- installing DEC-BASIC, DEC-C++, and FMS (Forms Management System) went without a hitch
- we require FMS because we still support a small number of green-screen apps
- we are still waiting for a DEC-C license which was overlooked during HP's license trade-in program
Day 5 (playing with RAID)
- When I did the initial OpenVMS install a week ago I noticed that I was writing to both my disks. This machine was delivered with an integrated (built into the motherboard) HP Smart Array P410i controller and someone had already configured both drives as part of a single RAID-1 logical unit (aka disk mirror). Okay so redundancy isn't a bad thing but I needed a second logical volume for files associated with our business (RMS-ISAM databases, MariaDB databases, Apache, photographs, spreadsheets, etc.) but how do I manage the RAID array? More importantly, I just purchased two additional drives and I want to install/configure them without calling HP/HPE
- Page 145 of the manual HP Integrity rx2800 i2 Server User Service Guide begins by describing utilities not found anywhere on my system. Many web
sites will tell you that a kit containing file saupdate.efi can be easily located and downloaded from the HP web site but this was not the case
with me
- did I mention that this was the month HP began extensive changes to their web site as part of their plans to split the company into two? Much stuff at www.hp.com was unavailable during the move to www.hpe.com
- So as of Friday (2015-06-26), any attempts to search for the phrase "P410i" will yield a lot of information but none of it will be of any use to the OpenVMS
community. For example:
surf over to: http://www.hpe.com	(paragraph was updated on 2016-02-11)
click		: SUPPORT
click		: HPE Servers, Storage and Networking
click		: Download Drivers
type		: P410i
click		: GO
view results	: notice lots of ProLiant BL + DL products are listed
click on	: HP Smart Array P410i Controller
click		: Get drivers, software & firmware
search drop-down: look for "OpenVMS" or "OVMS" (but you will not find either)
select drop-down: "OS Independent"
result		: ~100 firmware files but nothing of use to OpenVMS or UEFI
		: You will see a lot of Linux stuff here (RPM files, etc.)
- Now try this:
surf over to	: http://www.hpe.com	(paragraph was updated on 2016-02-11)
click		: SUPPORT
click		: HPE Servers, Storage and Networking
click		: Download Drivers
type		: HP Integrity rx2800 i2
click		: GO
click		: Get drivers, software & firmware
click on	: HP Integrity rx2800 i2 Rack Optimized Server
select drop-down: "OpenVMS v8.4"
result		: 9 firmware files including these 2 in the
			"Firmware Controller Storage" section:
----------------------------------------------------------------
** CRITICAL ** SAS IO Firmware
	Update Package (EFI) - HP Integrity rx2800 i2 Servers
	which contains this file: rx2800i2IOSASFW578_EFI.zip
** CRI2TICAL ** SAS IO Firmware
	Update Package for OVMS - HP Integrity rx2800 i2 Server
	which contains this file: HP-I64VMS-IOCFM_RX2800I2-V0578.ZIPEXE
	(self extracting archive for OpenVMS Itanium)
Day 6 (adding two more drives)
- I installed an OpenVMS patch to make new firmware available so I could play with the RAID
- running self-extracting archive: HP-I64VMS-IOCFM_RX2800I2-V0578.ZIPEXE
- yields these two files:
- HP-I64VMS-IOCFM_RX2800I2-V0578--1.PCSI$COMPRESSED;1
- HP-I64VMS-IOCFM_RX2800I2-V0578--1.PCSI$COMPRESSED_HPC;1
- which you install from DCL via the PRODUCT command.
- At this time EFI files (including: SAUPDATE.EFI) will be copied into a root directory of your boot disk
- you will be able to see them from the UEFI shell accessible from the iLO port
- Shutdown OpenVMS to play with the RAID (you need to boot into the EFI shell)
<sr>	Shell>
<ur>	fs0:
<sr>	fs0:>\
<ur>	cd efi\tools	(search for SAUPDATE.EFI [storage array update] on your system)
<sr>	fs0:\efi\tools>
<ur>	saupdate get_mode p410i	(or: "saupdate get_mode all")
<sr>	The controller at 0:1:0:0 is in RAID mode
	fs0:\efi\tools>
<ur>	drivers -b
<sr>	            T   D
	D           Y C I
	R           P F A
	V  VERSION  E G G #D #C DRIVER NAME                         IMAGE NAME
	== ======== = = = == == =================================== ===============
	16 0000000A B - -  1 56 PCI Bus Driver                      PciBusDxe
	1A 00000014 B - -  1  1 Serial 16550 Driver                 Serial
	68 00000001 D - -  1  - ICH Serial ATA Controller Initializ SataControllerD
	6E 0000000A B - -  1  1 AHCI Bus Driver                     AhciDxe
	6F 0000000A D - -  3  - Platform Console Management Driver  ConPlatformDxe
	70 0000000A D - -  2  - Platform Console Management Driver  ConPlatformDxe
	71 0000000A B - -  3  3 Console Splitter Driver             ConSplitterDxe
	72 0000000A B - -  2  2 Console Splitter Driver             ConSplitterDxe
	73 0000000A ? - -  -  - Console Splitter Driver             ConSplitterDxe
	74 0000000A B - -  2  2 Console Splitter Driver             ConSplitterDxe
	75 0000000A ? - -  -  - Console Splitter Driver             ConSplitterDxe
	78 0000000A ? - -  -  - UGA Console Driver                  GraphicsConsole
	79 0000000A B - -  1  1 Serial Terminal Driver              TerminalDxe
	7A 0000000A D - -  1  - VGA Class Driver                    VgaClassDxe
	7B 00000000 D - -  1  - PCI VGA Mini Port Driver            VgaMiniPort
	7C 0000000A D - -  5  - Generic Disk I/O Driver             DiskIoDxe
	7F 0000000A D - -  2  - FAT File System Driver              Fat.efi
	81 0000000A B - -  1  1 SCSI Bus Driver                     ScsiBus
	82 0000000A ? - -  -  - Scsi Disk Driver                    ScsiDisk
	Press ENTER to continue, 'q' to exit:
<ur>	<enter>
<sr>	83 00000030 ? - -  -  - Scsi Tape Driver                    ScsiTape
	84 0000000A B - -  1  3 Partition Driver(MBR/GPT/El Torito) PartitionDxe
	85 0000000A B - -  7  4 Usb Bus Driver                      UsbBusDxe
	86 0000000A D - -  2  - Usb Keyboard Driver                 UsbKbDxe
	87 00000011 ? - -  -  - Usb Mass Storage Driver             UsbMassStorageD
	88 0000000A D - -  2  - Usb Mouse Driver                    UsbMouseDxe
	89 00000020 D - -  5  - Usb Uhci Driver                     UhciDxe
	8A 00000030 D - -  2  - Usb Ehci Driver                     EhciDxe
	8C 0000000A D - -  4  - Simple Network Protocol Driver      SnpDxe
	8D 0000000A B - -  4 12 MNP Network Service Driver          MnpDxe
	8E 0000000A B - -  4  4 ARP Network Service Driver          ArpDxe
	8F 0000000A B - -  4 32 IP4 Network Service Driver          Ip4Dxe
	90 0000000A D - -  4  - IP4 CONFIG Network Service Driver   Ip4ConfigDxe
	91 0000000A B - - 24 20 UDP Network Service Driver          Udp4Dxe
	92 0000000A B - -  4  4 DHCP Protocol Driver                Dhcp4Dxe
	93 0000000A B - -  8  4 MTFTP4 Network Service              Mtftp4Dxe
	94 0000000A D - - 24  - UEFI PXE Base Code Driver           UefiPxeBcDxe
	95 0000000A D - -  4  - Tcp Network Service Driver          Tcp4Dxe
	96 0000000A ? - -  -  - iSCSI Driver                        IScsiDxe
	9C 00000350 B X X  1  2 Smart Array SAS Driver v3.50        MemoryMapped(0x
	BF 04030100 B X X  1  1 Intel(R) PRO/1000 4.3.01 PCI-E      MemoryMapped(0x
	C2 04030100 B X X  1  1 Intel(R) PRO/1000 4.3.01 PCI-E      MemoryMapped(0x
	C6 04030100 B X X  1  1 Intel(R) PRO/1000 4.3.01 PCI-E      MemoryMapped(0x
	C9 04030100 B X X  1  1 Intel(R) PRO/1000 4.3.01 PCI-E      MemoryMapped(0x
	Press ENTER to continue, 'q' to exit:
<ur>	q
<ur>	devices -b
<sr>	C  T   D
	T  Y C I
	R  P F A
	L  E G G #P #D #C Device Name
	-- - - - -- -- -- -------------------------------------
	5F R - -  -  1 56 PcieRoot(0x30304352)
	76 D - -  5  -  -<UNKNOWN>
	77 D - -  2  -  -<UNKNOWN>
	98 D - -  1  -  - PcieRoot(0x30304352)/Pci(0x0,0x0)
	99 D - -  1  -  - PcieRoot(0x30304352)/Pci(0x1,0x0)
	9A B X X  1  2  2 Smart Array P410i Controller ---------+
	9D D - -  1  -  - PcieRoot(0x30304352)/Pci(0x3,0x0)	|
	(...snip...)						|
<ur>	drvcfg							|
<sr>	Configurable Components					|
	  Drv[BF]  Ctrl[BD]  Lang[eng]				|
	  Drv[C2]  Ctrl[C0]  Lang[eng]				|
	  Drv[C6]  Ctrl[C4]  Lang[eng]				|
	  Drv[C9]  Ctrl[C7]  Lang[eng]				|
	  Drv[9C]  Ctrl[9A]  Lang[eng] <------------------------+
<ur>	drvcfg -s 9C 9A <---------------------------------------+
<sr>	Set Configuration Options
	  Drv[9C] Ctrl[9A] Lang[eng]

	 Option Rom Configuration for Arrays (ORCA), version 3.50
	 Copyright 2009 Hewlett-Packard Development Company, L.P.
	 Controller: HP Smart Array P410i
		Create Logical Drive
		View Logical Drive
		Delete Logical Drive
- Next, I physically inserted two new drives into the next two spare slots then used the ORCA utility to include them as part of a RAID-1 set. The whole procedure took less than one minute
Day 7 (Simplistic Benchmarks)
- Playing with the VMS-BASIC compiler. I compiled the following demo program on both Alpha and Itanium making sure to get the loop limit from an external prompt in
order to foil certain kinds of automatic compiler optimizations. Also, both were compiled with command-line switch "/optim=level=0"
1000	!============================================================
	! title  : neil_100.bas
	! purpose: compare executable sizes between Alpha and Itanium
	!============================================================
	option type=explicit
	set no prompt
	declare string junk$, long i%, j%
	when error in
	     print "number of loops? (default=10) ";
	     input junk$
	     i% = integer(junk$)
	use
	     i% = 0
	end when
	!
	select i%				!
	    case 1 to 100			!
	    case else				! default
		i% = 10				! default
	end select				!
	for j% = 1 to i%			!
	    print "this is test line:";j%	!
	next j%					!
	end					!
- And here are the resultant file sizes
File Name Alpha Itanium NEIL_100.BAS 1KB 1KB NEIL_100.EXE 4KB 10KB NEIL_100.LIS 20KB 34KB NEIL_100.OBJ 6KB 6KB - For the example program shown above, the Itanium executable is 2.5 times larger. What follows is data extracted from the listing files
PROGRAM SECTIONS (Alpha) Name Bytes Attributes 0 $READ_ONLY$ 296 PIC CON REL LCL SHR NOEXE RD NOWRT OCTA 1 $CODE$ 852 PIC CON REL LCL SHR EXE NORD NOWRT OCTA 2 $LINK$ 344 NOPIC CON REL LCL NOSHR NOEXE RD NOWRT OCTA 3 $LITERAL$ 54 PIC CON REL LCL SHR NOEXE RD NOWRT OCTA 4 $ARRAY 0 NOPIC CON REL LCL NOSHR NOEXE RD WRT OCTA 5 $DESC 0 NOPIC CON REL LCL NOSHR NOEXE RD WRT OCTA PROGRAM SECTIONS (Itanium) Name Bytes Attributes 0 $READ_ONLY$ 296 PIC CON REL LCL SHR NOEXE RD NOWRT OCTA 1 $CODE$ 1584 PIC CON REL LCL SHR EXE NORD NOWRT OCTA 2 $LINK$ NOPIC CON REL LCL NOSHR NOEXE RD NOWRT OCTA 3 $LITERAL$ 54 PIC CON REL LCL SHR NOEXE RD NOWRT OCTA 4 $ARRAY 0 NOPIC CON REL LCL NOSHR NOEXE RD WRT OCTA 5 $DESC 0 NOPIC CON REL LCL NOSHR NOEXE RD WRT OCTA - Comparing the listing files:
- the total of all program sections is 1.25 times larger on Itanium
- the total of the CODE and LINK sections is 1.32 times larger on Itanium
- Interpretation/Extrapolation (2015-07-xx):
- The cores in our rx2800-i2 are running at 1.6 GHz:
- The CPUs in our production AlphaServer DS20e are running at 833 MHz (our development machine runs at 633 MHz)
- This means the Itanium clock is 1.92 times faster
- Running 1.92 times faster on code 1.25 times larger means that we should expect an unoptimized BASIC program to run 1.54 times faster
- Running 1.92 times faster on code 1.32 times larger means that we should expect an unoptimized BASIC program to run 1.46 times faster
- with twice as many cores (four times if you include hyper threading) I suspect this new box should, at the very least, be able to do six (4 x 1.50) times more
work in parallel. It is surprising that these same numbers also reflect the all-in price of a new Itanium being four to six times lower than a new (in 2002)
AlphaServer
- Caveat: these overly simplistic comparisons ignore other important factors like: memory technology, memory size, cache architecture, cache size, disk drive transfer rates, maximum NIC speeds, etc.
- Real World Update #1 (2015-07-11): compiling a very large (60k lines) BASIC program on this Itanium is 2.1 times faster
than our production AlphaServer.
- Real World Update #2 (2016-02-14): something wonderful happened after we installed the SAS Cache Memory Module (see Day20
below). Compiling the large 60k line program now only requires 35 seconds on this Itanium making it 10.3 times faster than Alpha. Recall that
this is a "single process" observation because the compiler can only engage one CPU core.
Label Machine CPU clock CPUs Memory
TypeMemory
SizeRaid 60k Line
Compile TimeSingle Task Speed Up Total
Speedup?DVLP AlphaServer-DS20e 633 MHz 2 DDR 2 GB Mylex 960 361 seconds n/a PROD1 AlphaServer-DS20e 833 MHz 2 DDR 4 GB RA-3000 241 seconds n/a PROD2 Itanium rx2800-i2 1.6 GHz one quad core (HT=8) DDR2 64 GB P410i 35 seconds 10.3 times faster than DVLP
6.9 times faster than PROD120.6
13.8
Day 8
- Today I was provided a new LAN circuit to be used as a permanent iLO LAN connection (you need to use the iLO serial port to do the configuration)
- This required a reset/reboot of the iLO (Management Processor) and this was all done with OpenVMS running (very cool).
- By default, connecting to the iLO is done over TCP port 2023 via SSH on port 22 (note the port number; this is not a typo)
- TeraTerm worked like a charm
Day 9 (Began porting software)
- Today I created directories on the Itanium to replicate our development environment on the Alpha (we do not have any commercial source code versioning tools or source
code repositories)
[dvlp]		- files like:	yada.bas	(VMS-BASIC sources)
				yada.com	(DCL build scripts)
				yada.c		(DEC-C sources)
[dvlp.cxx]	- files like:	yada.cxx	(DEC-C++ sources)
[dvlp.fil]	- files like:	yada.rec	(record maps)
				yada.opn	(file opens)
[dvlp.fdl]	- files like:	yada.fdl	(RMS fdl files used in ISAM tuning)
[dvlp.flb]	- files like:	yada.flb	(FMS form libraries)
				yada.fms	(FMS forms)
[dvlp.fun]	- files like:	yada.fun	(VMS-BASIC standalone functions)
				yada.sub	(VMS-BASIC standalone sub programs)
[dvlp.inc]	- files like:	yada.inc	(VMS-BASIC standalone includes)
[dvlp.mar]	- files like:	yada.mar	(macro assembler stuff)
[dvlp.sql]	- files like:	yada.sql	(SQL files to perform MariaDB maintenance)
				yada.com	(DCL scripts to perform MariaDB maintenance)
[src]		- production copies of everything found in/under [dvlp]
[data]		- files like:	yada.dat	(RMS/ISAM production data files)
- Next, I copied over all our source code from the Alpha then prepared to run the build scripts
- Some very old (not yet modernized) BASIC programs reference VMS run-time libraries (STARLET.OLB) but the sources do not pick up declarations from BASIC$STARLET.TLB.
These programs pickup their external symbols declarations via an include [.inc]vms_external.inc but expect to have symbols resolved at link time where
we associate them with "[.mar]symbols.obj" which is created from DCL by invoking the macro assembler like so:
$mac [.mar]symbols.mar
Even though we are now on a different architecture CPU, this command worked without modification.
comment: I have got to find the time to get rid of this old crud
- Many of our smaller programs only contain a few external functions found in [.fun] which are compiled every time we rebuild. Some larger programs (which are
continually being rebuilt) expect to find the object files associated with precompiled functions inside our custom library ICSIS_FUNCTIONS.OLB (anyone modifying an
external function is responsible for updating the library). We have been using a home-brewed DCL script to create/maintain this OLB for the past 15 years starting with
VAX then leading to Alpha. On Itanium this script only works once (library creation) but fails when replacing an individual module upon a subsequent pass. (you will get
a weird message about your OLB not being an ELF library).
- the fix: modify the library maintenance script replacing "libr/cre ICSIS_FUNCTIONS.OLB" with "libr/cre/obj
ICSIS_FUNCTIONS.OLB"
- the fix: modify the library maintenance script replacing "libr/cre ICSIS_FUNCTIONS.OLB" with "libr/cre/obj
ICSIS_FUNCTIONS.OLB"
- I invoked a few scripts which rebuild all 200+ programs. There were ~25 failures all due to poor housekeeping (eg. they also could not be rebuilt this way on Alpha)
- the fix: minor modifications to ~25 programs which then were rebuilt without incident
- the fix: minor modifications to ~25 programs which then were rebuilt without incident
- I have one program which builds with some very strange linker messages on Itanium. This area of the code is a place where I employ sys$cmexec to
call a small function which sets/changes a logical name in table LNM$SYSTEM_TABLE (Why do it this way? It is a supervisor-mode logical name which means I must first
change over to executive mode; if this stand-alone program used a CLI then I could just use LIB$SET_LOGICAL; in hindsight the CLI-based approach might have been less
painful).
- the fix:
- modify the called code changing from a BASIC FUNCTION to a BASIC SUB
- change one declaration in the calling code
- the fix:
Day 10
- due to an administrative FUBAR when we ordered this new platform, DEC-C was missed. That license arrived today and I was able to build all of our "C" programs and
external functions with no problems whatsoever.
- this excludes some gSOAP apps (haven't installed gSOAP just yet)
- this excludes some MariaDB apps (haven't installed MariaDB just yet)
- this excludes some third-party apps dependent upon MMS (haven't installed MMS just yet)
Day 11 (Apache woes : part 1)
- Okay so I didn't see this one coming. Today I downloaded a fresh copy of CSWS-2.2-1 from the HP website.
- It installed without any errors but moving over the served content was pointless because the webserver doesn't appear to work
- Our home page contains some jQuery which is employed to convert a linked-list into a sliding menu (http://www.dynamicdrive.com/dynamicindex1/ddsmoothmenu.htm) but most other pages at our site also make extensive use of jQuery and AJAX so if the home page has problems then so will everything else.
- Weird browser behavior
- IE11 seemed to work properly
- Firefox-39 rendered a page but there was no sliding menu, just a linked list
- Chrome-44 didn't render anything at all but further examination with the Developer Tool's (hit F12) showed a problem with incomplete chunked transfers
- Rather than waste your time telling you all the things I did which did not work, let me say that CSWS-2.2-1 now requires text files to be stored in stream_lf format
- We were running CSWS-2.2 on the Alpha and it did not require stream_lf format text files so it looks like we're in a jam for a little while. What to
do?
- load CSWS-2.1 then start applying update patches -OR-
- convert all text files to stream_lf (this includes software generating new static html-based reports as well as interfaces responsible for capturing text-file uploads)
Day 12 (Apache patch)
- Good news. I requested a "CSWS-2.2-1 patch" from HP today via my OpenVMS support account. HP responded within an hour by placing the patch in a 24-hour drop box. I installed the patch ( a replacement version of APACHE$HTTPD_SHR.EXE ) and now everything works properly.
- I downloaded then installed a new version of DDSMOOTH from here: http://www.dynamicdrive.com/dynamicindex1/ddsmoothmenu.htm
- comment: anyone working with VMS or OpenVMS is probably aware of FTP-induced corruption were some files (like .js) might be saved with a record format of "512-fixed" rather than "variable length". Apparently that was what had happened with the previous version of DDSMOOTH on Alpha but we didn't know it. This time I downloaded the files to my PC, zipped them, then FTP'd the zip to OpenVMS. Unzipping text files on OpenVMS almost always saves them as stream_lf which is not a problem for editors and/or Apache.
- Installed Mark Berryman's port of MariaDB (an alternate fork of MySQL)
Day 13 (my FTP woes)
I think it is safe to say that most modern systems push messages between them using SFTP (which is based upon SSH) or SOAP. However, older interfaces connected to other non-OpenVMS systems may require FTP transfers and this can be a problem. Why?
- almost all out-of-the-can software can not make sense of VMS/OpenVMS file listings as viewed from FTP (remote systems expect to see a UNIX display)
- this is especially true of almost all graphical FTP tools available for PCs (Attachment's Reflection for UNIX and OpenVMS is one notable exception)
- scripting is virtually identical on all implementations of SFTP
- scripting is implementation specific with FTP (most remote systems expect to see UNIX)
- the only things that FTP and SFTP have in common are three letters (this prevents others from using an SFTP client to connect to our FTP server)
- while FTP supports ASCII-mode transfers, SFTP does not
- FTP scripting will allow you to include a password in the script, this was removed from SFTP for obvious reasons
Okay so it turns out that we have two separate FTP-related issues which may force us to a third-party stack (MultiNet)
- Some foreign systems connect to our OpenVMS system via FTP and expect to see a UNIX-like file listing. These are programmatic transfers written using Microsoft's C#
making use of the FTP API built into .NET -AND- we have had no luck getting those programmer's to change their code (they push-pull
between various systems of which we are only one of many)
- both TCPware and MultiNet provide logical names (eg. multinet_ftp_unix_style_by_default is one of many) to adjust the view as seen by connecting clients. This is done on a per-account basis by inserting ftp-specific logical names into the receiving account's LOGIN.COM script.
- TCPIP Services for OpenVMS does not have anything like this.
- TCPIP Services does employ a system-wide logical name ( TCPIP$FTPD_ UNIX_DISPLAY ) but it does not do what you might think (it only allows filenames with multiple dots to be displayed that way)
- We are required to do programmatic semi-intelligent FTP transfers to other sites so need an FTP API or FTP scripting capabilities. Here is the pseudo code:
- prepare to push a message file to a remote system
- connect to the remote system via FTP
- look to see if file "YADA.txt" exists
- If NO, then push our message
- If YES, then the remote system has not picked up previous file so don't overwrite it but try again in 60 seconds
- If still YES, then raise an alarm
- If this interface were rewritten today we would demand to push uniquely named files of the form "YADA-ccyymmddhhmmss.txt" but would still need to deal with problems like: "full destination disk", "unable to connect", and "receiving end not processing their inbound message files"
(our) Alpha Environment
Our existing AlphaServer DS20e employs the TCPware stack
- many of our inbound FTP accounts employ special ftp-specific logical names to make our system appear UNIX-like
- TCPware provides an "FTP Library" which is an FTP API used by high-level languages (BASIC and C in our case) to do outbound programmatic FTP transfers
- Some outbound FTP transfers still employ the programmatic scripting (referred to as a "take" file)
(my) Itanium Options
- get a TCPware license for this Itanium
- minus: extra money
- plus: very few (perhaps no) changes required in our programs or scripts
- minus: TCPware is stuck at IPv4 and will never be upgraded to IPv6 according to the vendor (not currently a problem but could be within a year or two)
- get a MultiNet license for this Itanium
- minus: extra money
- plus: like TCPware, MultiNet supports special logical names to modify how FTP clients see our system
- plus: supports both IPv4 and IPv6 (unlike TCPware)
- minus: FTP Library is gone so no FTP API to do FTP from high level languages (which means that any program doing FTP will need to be rewritten using simple scripts)
- minus: does not support programmatic scripting (a "/take" switch exists but works like the "/input" switch found in TCPIP Services)
- any solution developed here would need to be really dumb
- stay with TCPIP Services for OpenVMS
- plus: free with OpenVMS license
- plus: supports both IPv4 and IPv6 (unlike TCPware)
- minus: no logical names (per-account or system-wide) to present UNIX-like displays to FTP clients
- we would probably need to get a second UNIX or WINDOWS box which would be designated as designation for FTP clients. This could get messy
- minus: no support for programmatic FTP scripting
- any solution developed here would need to be really dumb:
- invoke script to connect to remote system to look for presence of desired file, then exit
- make some decision
- invoke a different script to do the next step
- any solution developed here would need to be really dumb:
Day 14 (human-caused problems with SFTP)
- Received a trial license from Process Software then downloaded and installed MultiNet
- As usual, I was interrupted when configuring SSH which led to some delays in getting SFTP to work properly.
- I believe this very misleading error message
Disconnected; protocol error (Protocol error: packet too long
would have happened with any stack from any vendor which is why I have documented the problem here.
- I believe this very misleading error message
- I think I found a problem with FTP UNIX mode. The MultiNet version of the process logicals are supposed to work the same way as they do in TCPware but they don't. So
check out this stub from LOGIN.COM script of one of the accounts needing this
$! logicals for TCPware
$       DEFINE TCPWARE_FTP_UNIX_STYLE_BY_DEFAULT        TRUE
$       DEFINE TCPWARE_FTP_DISALLOW_UNIX_STYLE          FALSE
$       DEFINE TCPWARE_FTP_UNIX_STYLE_CASE_INSENSITIVE  TRUE
$       DEFINE TCPWARE_FTP_UNIX_YEAR_OLD_FILES          TRUE
$       DEFINE TCPWARE_FTP_STRIP_VERSION                TRUE
$! logicals for MultiNet (our Itanium box)
$       DEFINE MULTINET_FTP_UNIX_STYLE_BY_DEFAULT       TRUE
$!~~~   DEFINE MULTINET_FTP_DISALLOW_UNIX_STYLE         FALSE   (bug - must be undefined)
$       DEFINE MULTINET_FTP_UNIX_STYLE_CASE_INSENSITIVE TRUE
$       DEFINE MULTINET_FTP_UNIX_YEAR_OLD_FILES         TRUE
$       DEFINE MULTINET_FTP_STRIP_VERSION               TRUE
Day 15 (gSOAP)
- I found some spare time today to install gSOAP; this took no time at all
- Next, I used my scripts to build the client and server apps which were written in "C"; this took even less time and was totally uneventful (and the client program needed to link against the OpenSSL libraries)
- comment: by why should I be surprised? Bell Labs created the "C" language with portability in mind
Day 16 (problem with the Itanium Linker)
- Numerous people (including me) have been crabbing that OpenVMS should be more UNIX-like. We all got our wish with the Itanium Linker whose origins begin in UNIX SVR4 as is briefly described here: Executable and Linkable Format (ELF)
- Our system has several apps which "build properly via the MMK (make) tool on Alpha" but fails on IA64 with the following link error:
%ILINK-E-INVLDHDR, invalid ELF header; field 'ehdr$q_e_phoff' has invalid value %X0000000000000048 - My link error was associated with linking against sys$share:libzshr.exe so I located then installed a new version of ZLIB (v1.28) but this did not help
- Since ZLIB is built using MMK I located then installed a new version of MMK (v5.1) but this did not help
- At this point browsing for ehdr$q_e_phoff yielded a lot of hits relating to ELF MAGIC NUMBERS which resulted in me doing "$ana/obj libzshr.exe" and
"$dump/page libzshr.exe" (where I was able to see "x48" in the correct position)
- This is one of the new ELF parameters you will see documented in ELFDEF (elfdef.h) along with: ehdr$b_ei_mag0, ehdr$b_ei_mag1, ehdr$b_ei_mag2, ehdr$b_ei_mag3, ehdr$b_ei_class, ehdr$b_ei_data, ehdr$b_ei_version, ehdr$b_ei_osabi, ehdr$b_ei_abiversion
- Next I performed the previous "$ana" and "$dump" commands on file TCPIP$IPC_SHR.EXE which is a working share on my system but did not see any important differences between this file and libzshr.exe
- Next I began browsing for documents where people might have experienced problems linking against TCPIP shares on Itanium which led to an ECO with this caveat:
shares must always appear listed as one-liners after "sys$input/opt" - The first example below is the equivalent link command generated by our MMK and does not work
- The second link below contains the suggested modification and does work without errors or warnings
- Note: it would have been just as legal to insert "sys$input/opt" just above the last line. However, I have seen different warnings about not sending more than 900 characters to this compiler "on one equivalent line" where example-1 already exceeds 600 bytes. The equivalent line length of example-2 is ~200 bytes which ends just after "sys$input/opt"
$! link-1 (does not work on Itanium)
$! yields: 1 error and 4 warnings
$ link  /exec=qsrv.exe -
 [dvlpc.qsrv.objs]qsrv.obj, -
 [dvlpc.qsrv.objs]cgi.obj, -
 [dvlpc.qsrv.objs]cdescriptor.obj, -
 [dvlpc.qsrv.objs]cquery.obj, -
 [dvlpc.qsrv.objs]cstatus.obj, -
 csmis$dvlp:ICSIS_FUN_LIBRARY.OLB/library, -
 mysql055_root:[lib.ia64]libclientlib.olb/library, -
 mysql055_root:[lib.ia64]libdbug.olb/library, -
 mysql055_root:[lib.ia64]libmysys.olb/library, -
 mysql055_root:[lib.ia64]libsql.olb/library, -
 mysql055_root:[lib.ia64]libstrings.olb/library, -
 mysql055_root:[lib.ia64]libvio.olb/library, -
 mysql055_root:[lib.ia64]libyassl.olb/library, -
 sys$share:LIBZSHR.EXE/share
$! link-2 (does work on Itanium)
$! yields: 0 errors and 0 warnings
$ link  /exec=qsrv.exe -
 [dvlpc.qsrv.objs]qsrv.obj, -
 [dvlpc.qsrv.objs]cgi.obj, -
 [dvlpc.qsrv.objs]cdescriptor.obj, -
 [dvlpc.qsrv.objs]cquery.obj, -
 [dvlpc.qsrv.objs]cstatus.obj, -
 sys$input/opt
 csmis$dvlp:ICSIS_FUN_LIBRARY.OLB/library
 mysql055_root:[lib.ia64]libclientlib.olb/library
 mysql055_root:[lib.ia64]libdbug.olb/library
 mysql055_root:[lib.ia64]libmysys.olb/library
 mysql055_root:[lib.ia64]libsql.olb/library
 mysql055_root:[lib.ia64]libstrings.olb/library
 mysql055_root:[lib.ia64]libvio.olb/library
 mysql055_root:[lib.ia64]libyassl.olb/library
 sys$share:LIBZSHR.EXE/share
Day 17 (Apache woes : part 2)
Overview
- For the past three years we have support web-based file uploads to our OpenVMS-8.4 Alpha platform.
- These files (both text as well as binary) are sent by contractors and can be as large as 500 MB
- we can go higher but have decided to block anything over 500 MB because we haven't gotten around to buying more drives
- Anyway, this is all done with a little bit of HTML, CGI and CSWS-2.2 (we employ the HTTP POST method)
- These files (both text as well as binary) are sent by contractors and can be as large as 500 MB
New Problem
- We are currently running CSWS-2.2-1 on the new Itanium and I just learned that we can't upload any file greater than 61 KB
- Thinking this could be a MultiNet problem, I flopped our stack back to TCPIP Services where the limit jumped to 140 KB
- Our code was written in VMS-BASIC so I quickly banged out a C-based test-tool just to convince myself this problem had nothing to do with the Basic-RTL
- Downgrading to CSWS-2.2 fixed the problem (HP was notified on 2015-10-08)
- I've got an old Alpha junker sitting in the corner with OpenVMS-8.4 installed. Just out of curiosity, I installed the Alpha version of CSWS-2.2-1 and it worked properly.
- So this problem only affects Itaniums
- HPE just informed me that the problem has been isolated to module APACHE$APR_SHR.EXE and that the module from 2.2 can be used to make 2.2-1 work properly
- HPE just informed me that a publishable fix is now available via a private drop-box. Not sure when the rest of the community will see this on the HPE download site
Day 18 (important miscellaneous stuff)
Third Party Software (we can't live without)- DELIVER
- we need this to intercept inbound mail
- http://www.decuslib.com/DECUS/freewarev80/deliver/deliver.zip
- supports VAX, Alpha, and Itanium
- MUNPACK (ver 1.5)
- we need this to gracefully extract attachments from MIME-based emails
- http://www.decuslib.com/DECUS/freewarev50/mpack15/
- supports VAX, Alpha
- modify these two files then invoke a make tool like mms or mmk (we use mmk) and a c-compiler
- link.com
- descript.mms
- caveat: other sites offer MPACK/MUNPACK versions 1.6a and 1.6b which do supply Itanium binaries. However, they add new UNIX functionality for all OSs (like not writing out a file if it already exists). This isn't an issue on OpenVMS systems due to the ability of Files-11 to include a file version number. Anyway, if you use 1.6 then you must supply an additional command line switch to disable the new features.
- ZIP + UNZIP
- For the time being we will be using BACKUP to create nightly savesets which need to be zipped before sending across a network to our archival platform in another city. Very large savesets can only be zipped by an updated version of zip. Your can get ZIP-3.0 and UNZIP-6.0 here: ftp://ftp.info-zip.org/pub/infozip/vms/ but really large savesets should be compressed using gzip which you can get here: http://antinode.info/dec/sw/gzip.html (gzip is much faster than either bpzip or bzip2)
- SYSUAF Proxy
- Our webserver makes proxied DECnet connections to our Alpha (no password is sent across when we do RMS file operations over the DECnet cable) so you only need to remember how to enable the proxy feature in SYSUAF then bang them in
Day 19 (supported drives limitations)
- We are not going to purchase a tape system (our DRP plan would require at least two) so instead will produce nightly backup save-sets to an independent drive
- We are going to compress the files then FTP them to a hot-standby system in another city
- So we ordered two more drives which brings us from 4 to 6 then repeated the UEFI procedures above to run ORCA (Option Rom Configuration for Arrays)
- ORCA displayed the following message:
You cannot create another logical drive. You have reached
the maximum number of logical drives on this controller - What? The rx2800 manual clearly states that this server can support 1 to 8 drives. Now I haven't seen any official documents from HPE but lots of people are claiming we need to purchase an optional SAS Cache Memory Module
Day 20 (drive limitations removed)
- we ordered an SAS Cache Memory Module 512 MB (578882-001) and Cache Super Capacitor and Cable (587324-001)
- we installed them will little difficulty (experienced computer room techs with more than 30 years experience)
- contrary to the manual, the capacitor clips onto the PCI riser assembly just above the slot holding the SAS Cache Module
- the capacitor cable plugs into a little socket on the SAS Cache Module but you won't see it until you remove the module from the anti-static envelope
- you remembered to wear your anti-static strap, right?
- after power-up we saw console messages about firmware seeing the cache then charging the capacitor (I think it is the equivalent of one 8 Farad
capacitor traditional power supplies would first see as a dead short; hence the need to have software and hardware perform a controlled charging operation)
- that was not a typo; it is the equivalent of 8,000,000 uF
- running ORCA from the UEFI Shell (see above) allowed us to configure two new stand-alone drives
- we now have 6 drives
- slots 1 + 2 are joined as one RAID-1 volume set
- slots 3 + 4 are joined as one RAID-1 volume set
- slot 6 is a backup copy of our system disk which will only be used during emergencies
- slot 5 is a standalone scratch to be used as the destination for numerous backup operations from DCL
- Our backup strategy has changed. Since this machine has 4 NICs capable of running 1 Gb/s we grabbed two of them to create:
- a private DECnet network which only runs through our computer room
- a private TCP/IP network which also runs through our computer room as well as to an adjacent office
- a Windows-7 PC's in the office is running a server instance of FileZilla and is connected to this network
- we purchased ten One Terabyte USB drives which will be the destination for unzipped savesets
- it is someone's job to change the drive every day, update a paper log, then courier the driver to another location across town
- During an emergency recovery someone only needs a PC to FTP savesets back to the recovery host
- Our backup strategy has changed. Since this machine has 4 NICs capable of running 1 Gb/s we grabbed two of them to create:
- observations:
- now all disk operations are noticeably faster but I can't provide you with any before-after benchmarks
- if you are using the SAS drives for primary storage then install this kit even if you do not need additional storage. The increased performance is worth the price.
- when I first heard the phrase "super capacitor" I assumed it was just a marketing phrase but I was wrong (click: https://en.wikipedia.org/wiki/Supercapacitor ). Hopefully this change by HP will put an end to the constant reordering of replacement 4.8V MEH Batteries found in their onboard RAID controllers from the mid-2000's
Day 21 (the cutover)
- The cutover was totally uneventful. A 100% success.
- Well, perhaps only 99%. We missed a few rinky-dink items caused by lapses in our own documentation. This is an area we intend to improve.
- The cut-over was done on a Sunday, and the following Monday was a national holiday so only a skeleton staff used the system. Thus means that 99% of the rinky-dink stuff was fixed before the clients hit the system on Tuesday
- Most clients only noticed everything was a lot faster (perceived slow-downs are almost always related to the corporate Intranet or client PCs)
What a long strange trip this has been...
- Hardware
- this home-grown soup-to-nuts business system started life on a used 32-bit VAX-730 in 1991
- maintenance being the poor kid in town, our system migrated to computer hardware abandoned by other departments including: VAX-750, uVAX-3500, uVAX-4300, then finally VAX-6430 (while hardware was free we always had to buy software licenses)
- it was migrated to a used AlphaServer-4100 in 2001 then to a new AlphaServer-DS20e in 2002
- it was migrated to a new Itanium rx2800-i2 in 2016
- Software 1991
- our data was 100% ISAM (RMS)
- our code was 90% VAX-BASIC linked to FMS (forms management system) with 10% DCL
- we only employed DECnet with a little XCOM
- TCP/IP came in 1992 in the form of TCPware (there where no TCP/IP products available from DEC for VAX/VMS in those days)
- ~200 users employed VT-220 terminals to access the system via serial connections (dialup modems, dedicated modems, limited distance modems, LAT-based terminal servers)
- Software 2016
- our data is now 50% ISAM (RMS) and 50% Relational (MySQL/MariaDB)
- our code is 60% VMS-BASIC, 10% DEC-C/C++, 10% DCL, 20% JavaScript (including jQuery, and AngularJS)
- ~1400 users employ three major browsers (Chrome, Firefox, IE11) to access the system via TCP/IP
- they authenticate against a home-brewed application called the ProfileDB which allows us to have longer user names than would be possible with SYSUAF
- green-screen access is restricted to developers and system admins
Summary (so far)
- What a neat platform. Upon first blush this rx2800 appears ten times more powerful than our existing AlphaServer DS20e
but at one quarter the cost.
- by cost I mean both HP hardware (rx2800-i2) and licensed HP software (OpenVMS, DEC-C, DEC-C++, VMS-BASIC, FMS-DVLP)
- production-only platforms will reduce software costs by not including licensed development tools like compilers
- others might save more by purchasing used hardware from the third-party market
- OpenVMS boots in 36 seconds from the UFEI shell prompt (includes starting DECnet IV, TCPIP Services, DECwindows/Motif, Apache, and MariaDB)
- by cost I mean both HP hardware (rx2800-i2) and licensed HP software (OpenVMS, DEC-C, DEC-C++, VMS-BASIC, FMS-DVLP)
- I previously remember saying: I didn't think there was any argument (outside of not being in possession of your source code) for not porting "from VAX to Alpha".
- Now I am forced to say the same thing about porting "from Alpha to Itanium". In fact, I highly recommend it.
- While I have no doubt that our platform will eventually be migrated again to OpenVMS on x86-64 when VSI finishes their OS port, our 13-year-old Alpha was starting to give us some grief so we just couldn't wait any longer.
Project-02 : rx2660
Day 1 (fetch units; initial power up tests)
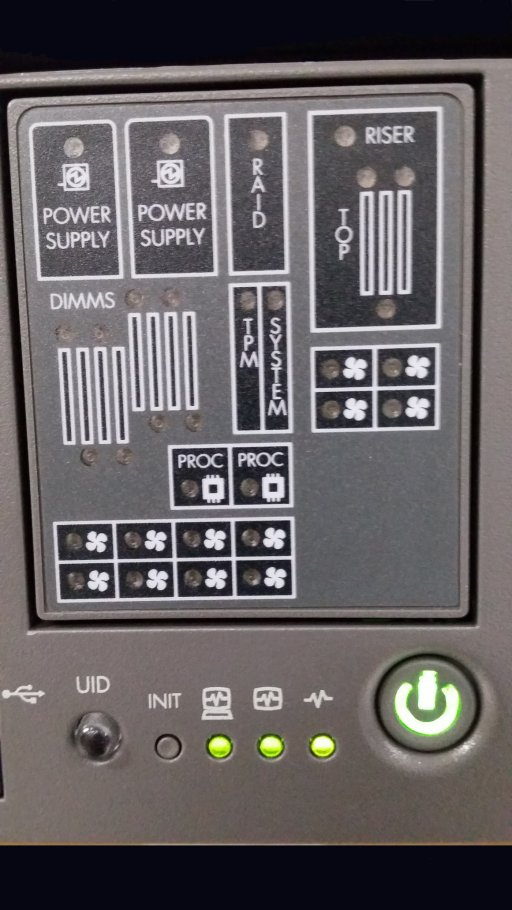
Front Panel LEDs
- I just acquired two rx2660 servers were about to be junked by another department (periodic hardware refresh) so I jumped in the van to retrieve them before they made
it to the crusher
- All the drives had been degaussed then crushed for security reasons so I ordered four new HP SAS 146 GB drives to begin testing
- After connecting a VGA monitor and USB keyboard, the servers boot to a GUI setup screen which can be flipped to so-called legacy mode
- GUI mode: white text on a blue background at the top; blue text on a gray windows below
- Legacy Mode: yellow text on a black background
- Specs:
- firmware was published in 2008 (updated to 2014)
- two dual-core CPU modules
- 1.65 GHz clock with 9 MB of cache ( Montecito )
- 16 GB of memory
- two RJ-45 style 1000 Base-T network connections
- iLO (integrated lights out module)
- includes a private LAN port
- two hot-swappable power supplies
- What a neat system! It is almost as easy to set up as a new PC (more or less)
- Like VAX before it, this appears to be the end of DEC Alpha technology in our shop; but OpenVMS still lives here!
Day 2 (installing drives; installing OpenVMS)
- New drives arrived today so I slotted two of them.
- After inserting my two I can still only see the DVD from the EFI Shell.
- You can run "map -r" all day but will not see the new drives until you run the ORCA (Option Rom Configuration for Arrays) Utility to tell the P400 controller that the drives are, or not, part of a RAID set. After that just run "bcfg" (boot configuration).
- Once this was done, I booted the OpenVMS DVD
- Like the rx2800 above, on a VGA monitor you will see ~ 120 dots (on one and a half lines) at which point you must continue with a serial connection to the iLO port if you wish to see OpenVMS boot messages as well as any other errors
- Like the rx2800 above, the real-time-clock will continue to prompt for the date-time at boot until "you install the load an OpenVMS license" -AND- "install OpenVMS-8.4 update 500"
- Unlike the rx2800-i2 above, this unit will recognize more than four drives without the requirement for optional controller memory (neat!)
Day 3 (updating firmware and other stuff)
- Our group has an active software support agreement with HP/HPE which allowed me to download the HPOFM (HP Offline Firmware Management) utility. This is an ISO image which you burn to a CD-ROM then boot in your Itanium server. This utility advanced my firmware dates from 2008 to 2013 in ~ 7 minutes. Slick!
- caveat for anyone who is tempted to work on the CPU:
- each CPU is installed in a ZIF (zero insertion force) socket. This means you must used the provided wrench to unlock the socket pins before removing the CPU
- you must also unlock the socket pins before installing a new unit unit then lock the pins afterward.
- see page 48 of HPE Integrity rx2660 Server User Service Guide for the details
- well that's all I'm going to post here. This is slick technology and I wished we could have used it to replace our Alpha Servers 5-years ago.
Day 4 (optional: Installing Linux on Itanium)
- I just downloaded a minimal CD image of Gentoo 20160826 (these are continually rolling updates so always include the published date)
- Linux installation details where moved here:
Installing Linux on Itanium (Gentoo, SuSE, Debian, etc.)
Common Stuff
Comparing UEFI to EFI
At first blush you might think that the graphics-based setup associated with EFI systems may be of some use to you but you would be wrong.
- many things can be seen in GUI mode (like whether "CPU threading" is enabled or disabled) but can only be changed from text mode (also called
legacy mode).
- this can be "text mode on a VGA monitor" or "text mode on a character cell terminal over the iLO port"
- there is a boot command associated with EFI but the only way to boot this UEFI system is via the bcfg (boot configuration) utility.
- don't waste your time with the VGA monitor unless you are doing a training session; the fastest way to set up any Itanium system is over the iLO port or the 9-pin Async Port
Monitoring RAID disks with MSA
- During my computer-room walk-through today (2018-11-09), I noticed one failed disk (#5) on scs-node KAWC09
- This got me thinking: what was the best way to monitor firmware-managed disks from OpenVMS? Perhaps I could write a DCL script that invokes the MSA utility.
- here it is: check_raid.com
- Anyway, just swapping the disk didn't fix anything so here are some notes to get around that. Notes are in RED and what I typed are in YELLOW
reminder:- (physical) DISKS number from 1 and are associated with slot numbers.
- (logical) UNITS number from 0 and are composed of one, or more, disks.
- only UNITS are presented to OpenVMS; if you do not define any units then you will not have any available storage
===========================================================================
title   : neil_msa_20181109.txt
purpose : detailed notes from a RAID adventure on 2018-11-09
platform: OpenVMS (Itanium) on an rx2660 hosting a P400 RAID controller
msa-docs: HP OpenVMS System | Management Utilities Reference | Manual: M-Z
          Order Number: BA555-90009
overview: DISK-5 (which is part of logical unit-1 on my RAID) has just been
	    replaced but the new disk needs to be coaxed back into action
facts   : DISK-1 is the only member of UNIT-0 (so no RAID)
	: DISKS 2-to-7 are members of UNIT-1 (RAID-5)
	: DISK-8 is the only member of UNIT-2 (so no RAID) but is currently
	    deslotted so I can perform some hot backups
	: I may reconfig this array sometime in the future so do not take
	  these settings as gospel
notes	1) use the MSA utility if a RAID controller is present; otherwise
	   use the SAS utility
	2) "MSA$UTIL.EXE" is the OpenVMS utility required to do this. So
	    use these DCL statements to create two symbolic DCL commands:
		$ MSA == "$sys$system:msa$util.exe"
			(MSA works with most of my machines)
		$ SAS :== $sys$system:sas$util.exe
			(SAS does work with my rx2600)
			(SAS does not work with my rx2660)
			(SAS does not work with my P410 on the rx2800)
	3) in the MSA utility, physical DISKs begin numbering from "1"
	4) in the MSA utility, logical UNITs begin numbering from "0"
	5) eject the bad disk; wait 10 seconds
	6) insert the new disk; wait up to 30 seconds (I have proved this
	   by continually executing "show disk 5")
=========================================================================
KAWC09(DVLP)::Neil>				! this is my DCL prompt
KAWC09(DVLP)::Neil> msa				!
MSA> set cont *
MSA> show unit 1

Unit 1:
In PDLA mode, Unit 1 is Lun 1.
Cache status      : enabled
Max Boot Partition: Unknown
Volume status     : VOLUME using interim recovery mode
 1 Disk(s) Failed or Removed:				<<< whoops
   Disk 5: (SCSI bus 1, SCSI id 3)			<<< whoops
6 Data Disk(s) used by lun 1:
   Disk 7: Partition 0; (SCSI bus 1, SCSI id 1)
   Disk 6: Partition 0; (SCSI bus 1, SCSI id 2)
   Disk 5: Partition 255; (SCSI bus 1, SCSI id 3)
   Disk 4: Partition 0; (SCSI bus 1, SCSI id 4)
   Disk 3: Partition 0; (SCSI bus 1, SCSI id 5)
   Disk 2: Partition 0; (SCSI bus 1, SCSI id 6)
Spare physical drives:
   No spare drives are designated.
Logical Volume Raid Level: RAID 1.  Mirroring
                           stripe_size=128.0KB
Logical Volume Capacity : 410.10 [440.35] GB
MSA>
================================================================
	force the new DISK back into the existing UNIT
================================================================
MSA> scan all
MSA> start recover
Rebuild operation is triggered for Units.
Issue SHOW UNIT command to know the status of the Units.
MSA> show unit 1

Unit 1:
In PDLA mode, Unit 1 is Lun 1.
Cache status      : enabled
Max Boot Partition: Unknown
Volume status     : VOLUME is currently recovering	<<< better
  ( Percentage complete 8 ) 				<<< better
6 Data Disk(s) used by lun 1:
   Disk 7: Partition 0; (SCSI bus 1, SCSI id 1)
   Disk 6: Partition 0; (SCSI bus 1, SCSI id 2)
   Disk 5: Partition 0; (SCSI bus 1, SCSI id 3)	<<< this thing is now back
   Disk 4: Partition 0; (SCSI bus 1, SCSI id 4)
   Disk 3: Partition 0; (SCSI bus 1, SCSI id 5)
   Disk 2: Partition 0; (SCSI bus 1, SCSI id 6)
Spare physical drives:
   No spare drives are designated.
Logical Volume Raid Level: RAID 1.  Mirroring
                           stripe_size=128.0KB
Logical Volume Capacity : 410.10 [440.35] GB
MSA> exit
================================================================
	some time later
================================================================
KAWC09(DVLP)::Neil> msa
MSA> set cont *
MSA> show unit 1

Unit 1:
In PDLA mode, Unit 1 is Lun 1.
Cache status      : enabled
Max Boot Partition: Unknown
Volume status     : VOLUME OK			<<< cool
 6 Data Disk(s) used by lun 1:
   Disk 7: Partition 0; (SCSI bus 1, SCSI id 1)
   Disk 6: Partition 0; (SCSI bus 1, SCSI id 2)
   Disk 5: Partition 0; (SCSI bus 1, SCSI id 3)
   Disk 4: Partition 0; (SCSI bus 1, SCSI id 4)
   Disk 3: Partition 0; (SCSI bus 1, SCSI id 5)
   Disk 2: Partition 0; (SCSI bus 1, SCSI id 6)
Spare physical drives:
   No spare drives are designated.
Logical Volume Raid Level: RAID 1.  Mirroring
                           stripe_size=128.0KB
Logical Volume Capacity : 410.10 [440.35] GB
MSA>
MSA> exit
KAWC09(DVLP)::Neil>
Reconfiguring RAID (P400 on rx2660)
overview:
- I am now working on an OpenVMS system where the user data disks are protected by a RAID scheme while the system disk is not (yikes!). Since I intend to retire in three years, I want these systems to be more easily maintainable (swap a bad drive on the fly - then coax with MSA rather than taking the system down)
- Up until this year, I was under the impression that bootable OpenVMS system disks were difficult to copy because the UEFI/EFI files where stored in a FAT-32 partition (as they are on most modern UNIX and Linux systems). I was wrong (read on to learn more)
- Our current RAID looks like this:
but I want this:
Disk (physical) 1 2 3 4 5 6 7 8 Units (logical) 0 1 2 Configuration JBOD RAID-1+0 JBOD Application SYSTEM USER1 Emergency SYSTEM Disk (physical) 1 2 3 4 5 6 7 8 Units (logical) 0 hot
spare
for unit 01 hot
spare
for unit 12 3 Configuration RAID-1 RAID-1 JBOD JBOD Application SYSTEM USER1 target for
hot backup
of USER1target for
hot backup
of SYSTEM
steps
first copy the data disk (RAID to single drive):- use the $backup utility to copy dka1 to dka2 (either "from DCL after you boot the OpenVMS DVD" -or- "from OpenVMS provided the system is
quiescent")
$ mount dka1:/over=ident
$ init  dka2: abcdef
$ mount dka2:/for
$ backup/image/ignore=(noback,inter) dka1: dka2:
- reboot the DVD (or OpenVMS system disk) but be sure to enter ORCA (online raid configuration utility) before the media is accessed.
- delete all unit definitions (do not do this unless you have good backups)
- move the new USER1 drive from slot 8 to slot 7
- move the old SYSTEM drive from slot 1 to slot 8
- create UNIT-0
- assign disks 1 + 2 configured as RAID-1+0
- I only want RAID-1 but this controller does not offer that choice
- since we are only using two drives the controller will only implement mirroring (RAID-1)
- assign disk 3 as a hot spare (type 's' on the disk you want)
- assign disks 1 + 2 configured as RAID-1+0
- create UNIT-1
- assign disks 4 + 5 configured as RAID-1+0
- I only want RAID-1 but this controller does not offer that choice
- since we are only using two drives the controller will only implement mirroring (RAID-1)
- assign disk 6 as a hot spare
- assign disks 4 + 5 configured as RAID-1+0
- create UNIT-2
- assign disk 7 as JBOD (just a bunch of drives)
- create UNIT-3
- assign disk 8 as JBOD (just a bunch of drives)
now copy both JBOD drives back to two RAID sets
- exit the ORCA utility then allow the DVD to continue to boot
- you will see dots displayed on the VGA terminal for the next 5-minutes
- now all output will only be seen on the serial console or iLO port (never on the VGA terminal)
- At the menu, press "8" to spawn to a process with a DCL prompt
$ show device d						! view the disks (show see four)
$!------------------------------------------------------
$ mount dka3:/over=ident				! mount the copied SYSTEM volume
$ init  dka0:/stru=5 abcdef				! init new SYSTEM volume; ODS5 is optional
$ mount dka0:/foreign					!
$ backup/image/ignore=(noback) dka3: dka0:		! "noback" is required for page + swap files
$ dismount dka0:					!
$ mount dka0:/over=ident				!
$ set def dka0:[sys0.syscommon.sysmgr]			!
$ @ BOOT_OPTIONS					! repair entries in the UEFI/EFI boot manager
$ dismount dka0:					! this RAID volume is ready for use
$!------------------------------------------------------
$ mount dka2:/over=ident				! mount the copied USER1 volume
$ init  dka1:/stru=5 abcdef				! init new USER1 volume; ODS5 is optional
$ mount dka1:/foreign					!
$ backup/image/ignore=(noback,inter) dka2: dka1:	! "noback" just incase
$ dismount dka2:					!
$ mount dka2:/over=ident				!
$ show dev/full dka2:					! -+- do these appear to be similar in size?
$ show dev/full dka3:					! -+
$ dismount dka2:					!
$ dismount dka3:					!
$-------------------------------------------------------
$! caveat: if you want to make disk-8 (unit-3) available for an emergency boot disk,
$! then you must mount the disk then execute script SYS$MANAGER:BOOT_OPTIONS on that disk
$! to repair (or create) the boot entry for the emergency disk
- Comment: contrary to popular belief, the OpenVMS system disk is not partitioned. There is no FAT-32 partition to hold the UEFI/EFI boot files. However, this file "SYS$SYSDEVICE:[VMS$COMMON.SYS$LDR]SYS$EFI.SYS" is a special file which can be found, read, then executed by the EFI/UEFI boot loader.
update
Today I noticed a few missing files on unit-1 (USER1) so I fetched the hot swap disk from our remote site then swapped disk-7 (a.k.a. unit-2).
I tried mounting the disk like so: mount dkb2:/over=ident/noassist but got a medium offline error message. Anyway, here is the fix
$ mount dkb2:/over=ident/noassist
  %MOUNT-F-ERROR, medium offline
$ msa
msa> set cont
msa> show disks
     ...snip...          (this worked as expected)
msa> MSA> sho unit 2

	Unit 2:
	In PDLA mode, Unit 2 is Lun 2.
	Cache status      : enabled
	Max Boot Partition: Unknown
	Volume status     : VOLUME failed               <<<---***
	1 Data Disk(s) used by lun 2:
	   Disk 7: Partition 0; (SCSI bus 1, SCSI id 1)
	Spare physical drives:
	   No spare drives are designated.
	Logical Volume Raid Level: RAID 0 or JBOD. No fault tolerance
	                           stripe_size=128.0KB
	Logical Volume Capacity : 136.70 [146.78] GB

mas> accept unit 2
     Media has been changed on unit 2
mas> exit
$ mount dkb2:/over=ident/noassist
  %MOUNT-I-MOUNTED CSMIS$USER1 mounted on _KAWC09$DKA2:
$
Reconfiguring RAID (P410i on rx2800-i2)
overview:
- I wanted to put my newly acquired MSA skills to good use by hardening our production system (rx2800-i2). That system has two RAID sets and I wanted to add two HOT-SPARES from MSA$UTIL so I would not need to take the system down (it has been running continuously for over 36-months)
- Our current RAID looks like this:
but I want this
Disk (physical) 1 2 3 4 5 6 7 8 Units (logical) 0 1 2 2 empty empty Configuration RAID-1 RAID-1 JBOD JBOD Application SYSTEM USER1 UTILITY emergency
SYSTEMDisk (physical) 1 2 3 4 5 6 7 8 Units (logical) 0 1 2 3 hot spare
for unit 0hot spare
for unit 1Configuration RAID-1 RAID-1 JBOD JBOD Application SYSTEM USER1 UTILITY emergency
SYSTEM
Steps
- I ordered two new 300 GB drives from HP then slotted them (this was done with the system running)
- I had no problems assigning disk-7 as a spare to unit-0 like so:
MSA> set cont *
MSA> set unit 0 /spare=7
- I was not able to assign disk-8 as a spare to unit-1 as the following display will show
MSA> set cont *
MSA> set unit 1 /spare=8
This logical drive has been configured with a later version of
an Array Configuration Utility.
It is not safe to use this program to make changes.
Adding or modification of Raid Unit failed.
MSA> exit
$
- I know that RAID unit-0 was built by HP in Singapore because that's the way it was delivered to Canada. I know that RAID unit-1 was built from the ORCA (Option Rom
Configuration for Arrays) by me three years ago. So why has HP allowed the firmware to get ahead of program MSA$UTIL ???
update: this alert (for an rx2660) shows that HP is aware of the problem - Apparently I only have two ways forward
- Reboot the system then use the firmware tool (ORCA) to assign disk-8 to unit-1
- Partially shutdown the system (being sure to close all the files on the VMS volume associated with unit-1)
- use $BACKUP to copy all of unit-1 to disk-8 (temporarily configured as JBOD)
- use MSA$UTIL to delete the definition of unit-1
- use MSA$UTIL to recreate unit-1
- use $BACKUP to copy all of disk-8 to unit-1
- use MSA$UTIL to add disk-8 to unit-1 as a hot-spare
Reconfig common
If you used the ADD command to create a new unit-disk association that didn't exist before
-OR-
If you inserted drives into P400, and wish to make OpenVMS aware of them
-THEN-
use either one of these DCL command to make OpenVMS aware of it
Note: depending upon the Itanium patch level, running the first set of commands may issue a warning telling you to use the second set of commands
!------------------------
$RUN SYS$SYSTEM:SYSGEN
    AUTOCONFIGURE ALL
    EXIT
!------------------------
$RUN SYS$SYSTEM:SYSMAN
    IO AUTOCONFIGURE/log
    EXIT
Building an iLO Maintenance Network
- first off, iLO is an acronym created by HP which means "integrated Lights Out". Other companies used terms like: IRC (Integrated Remote Console), RMC (Remote Management Console) to only name two of many.
- this technology was created to support computers installed in large data centers where there was no space (or desire) for a rarely sued dedicated console monitor.
- one neat feature of the iLO module is the multi-speed Ethernet port which is first configured from the console
- you need to set the IP address and mask; optionally change the maintenance access password; optionally configure other software
- in some large corporations you would just requisition an internal IP address but this may cost your department some annual money -AND- possibly expose your console to internal hacking
- most computers built in the last decade contain four NICs which means for my small organization (inside a large company) it makes more sense to build a private iLO Maintenance Network
- So this is how things looked last week:
- All connections marked "primary network" connected to a CISCO thingy
- All connection marked "mtce-network-1" are connected via an inexpensive 8-port hub. This network is used to certain types of online backups as well as remote maintenance. For example, it is now possible to reconfigure the primary network connection from a remote location provided you can get to one of the other boxes
- Likewise, all connection marked "mtce-network-2" are connected via an inexpensive 8-port hub.
One of six One One of three +---------------------------+ +---------------------------+ +------------------------+ | DL385p_gen8 (CentOS-7.7) | | rx2800-i2 (OpenVMS-8.4) | | rx2660 (OpenVMS-8.4) | | NIC-1 prod network (IPv4) | | NIC-1 prod network (IPv4) | | NIC-1 prod ntwk (IPv4) | | NIC-2 mtce ntwk 1 (IPv4) | | NIC-2 mtce ntwk-1 (IPv4) | | NIC-2 DECnet-IV | | NIC-3 mtce ntwk 2 (IPv6) | | NIC-3 mtce ntwk-2 (IPv6) | | | | NIC-4 (proposed iLO ntwk) | | NIC-4 DECnet-IV | | | | iLO n/c | | iLO n/c | | iLO n/c | +---------------------------+ +---------------------------+ +------------------------+ - But just look at those unconnected iLO ports. They are just begging to be connected to one of the maintenance networks. When this is done, you might never need to drag out a VT220 terminal ever again
- so I put all the iLO ports on a 192.168.255 network connected by an 8-port hub which is only available from some unused NICs on my CentOS platforms
Weird networking problem with MultiNet-5.5
hardware: rx2660stack: MultiNet-5.5
- This development system was built in 2016 and has been rebooted numerous times up until 2024.
- I installed a security patch, then rebooted the system, but the TCP/IP network will not come up.
- The following blurb was seen in the startup log file
%MULTINET-W-STARTUPERR, error starting LAN device EWA0 for se0
-SYSTEM-F-IVADDR, invalid media address
%MULTINET-I-TRYAGAIN, trying again with 3 LAN buffers
%MULTINET-W-STARTUPERR, error starting LAN device EWA0 for se0
-SYSTEM-F-IVADDR, invalid media address
%MULTINET-I-TRYAGAIN, trying again with 2 LAN buffers
%MULTINET-W-STARTUPERR, error starting LAN device EWA0 for se0
-SYSTEM-F-IVADDR, invalid media address
%MULTINET-I-TRYAGAIN, trying again with 1 LAN buffer
%MULTINET-W-STARTUPERR, error starting LAN device EWA0 for se0
-SYSTEM-F-IVADDR, invalid media address
%MULTINET-F-CANTSTART, unable to start LAN device; giving up
- We just found out that the CISCO switch had been replaced with a newer model, and just noticed that this NIC is running at 1000-Gb/s whilst the other OpenVMS platforms are running at 100-Mb/s. Question: did the NIC negotiate a faster speed? Perhaps.
- So I used these commands to slow down the NIC, then rebooted
Legend:
  <sr> = system response
  <ur> = user response
  <enter> = hit the enter key
===========================
<sr> $
<ur> mcr lancp
<sr> LANCP>
<ur> sho dev e                  ! see all ethernet ports
<sr> Device Listing, volatile database (25-MAR-2024 10:53:32.81)
     Device
     ------
     EWA0
     EWB0
     LANCP>
<ur> sho dev e /char		! see characteristics
<sr> KAWC09 Device Characteristics
     ...bla...bla...bla...
     LANCP>
<ur> def ewa0 /speed=100/noauto
<sr> LANCP>
<ur> set ewa0 /speed=100/noauto
<sr> LANCP>
<ur> exit
<sr> $
<ur> set def sys$system
<sr> $
<ur> @shutdown ! then reboot - Now all is well
- p.s. the software on this system is not part of any support contract. Perhaps I should look into some upgrades. Both OpenVMS-8.4 and MultiNet-5.5 have been replaced with newer products
External Links
- Hyper Threading
- Until this Itanium system came along in 2015 I always thought that Hyper Threading might be some sort of marketing scam. But if it is true that OpenVMS breaks up multithreaded-thread CPUs into a set of virtual CPUs which are queued by a thread dispatcher, then I was wrong.
- http://c.ymcdn.com/sites/www.connect-community.org/resource/resmgr/2011_boot_camp_presos/hein_i317_hyperthreading.pdf
- https://en.wikipedia.org/wiki/Hyper-threading
- https://www.parsec.com/public/Integrity_console.pdf from our friends at Parsec. This document describes the EFI console from an rx2600 perspective
- Installing Linux on Itanium (Gentoo, SuSE, Debian, etc.)
- http://ark.intel.com/products/family/451/Intel-Itanium-Processor (Kittson, aka Itanium 9700, released 2Q17)
 Back to Home
Neil Rieck
Waterloo, Ontario, Canada.